Variation Builder
- Daniele Federico
- Alan Stanzione
The Variation Builder is a tool designed for exporting geometries, materials and optionally variations. At export time, it will create several files, among which geometry files of the desired format, material files for the selected render engine and a variation json file.
If your scene contains Render Layers (Maya) or Takes (Houdini), this tool will save the association between their geometries and materials will be stored in the json file as variations. Usually such materials should be nodes for your desired render engine. The Maya Render Layers' or Houdini Takes' names will become the variation names.
While you can use the same geometries in different variations, the variation builder does not support Maya render overrides. Please create a different material, instead of using material render overrides.
Users need to make sure all material nodes going into the same render are named differently (file nodes, material nodes, etc.) to avoid node clashing.
The Variation Builder UI
The Export tab
Once your variations are ready, you can open the Variation Builder from the menu:
Atoms > Variations > Variation Builder
Alternatively, you can open it with the shelf button 
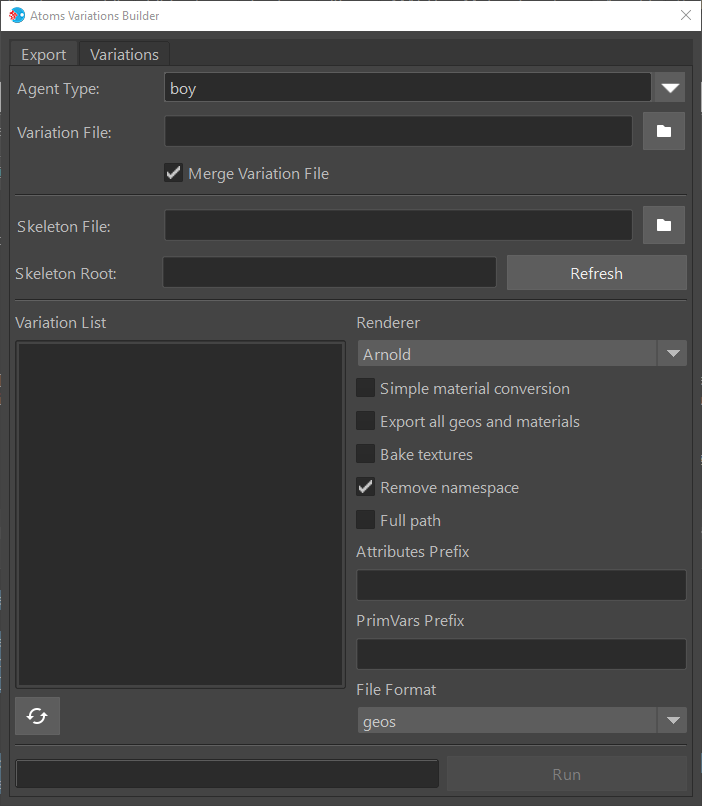
To export your variations correctly, please fill all the parameters:
- Agent Type: your agent type name (the list will pre-populate with all the agent type names available in your scene).
- Variation File: The destination variation json file.
- Merge Variation File: if true and you select a pre-existing variation json file, the process will merge the content of the pre-existing file with the current build.
- Skeleton File: the path to the agent type skeleton file.
- Skeleton Root: The skeleton root of your skeleton.
- Variation List: the list of the variations you want to export. If none is selected, all of them are exported.
- Renderer: The renderer you will be using. If you select "Material Attributes Only", only the preview/render data are exported in the variation json.
- Simple Material Conversion: if true and you used Maya materials such as lambert or blinn, the variation builder will replace your material nodes with a render specific material node at export time (i.e. aiStandard for Arnold). The process won't replace the full incoming network, just the material node.
- Bake Textures: your textures are baked with the selected renderer (this option might not be available on all host applications).
If enabled, you will be able to specify a resolution and intensity value for the baking light. - Create Thumbnails: a jpeg preview is generated for each variation. The image is generated using the current viewport.
- Full path: the geo names in the table are exported with the full paths. Use this option only if you care about having the original hierarchy in katana and in the alembic,fbx or Usd exported by Atoms.
- File format: choose the file format used to save meshes on disk. If you choose Usd and Arnold as renderer, the materials are saved as Usd file as well.
The variation builder will also create three subfolders at the same level of your variation json file:
- geometries: containing the geometry files
- materials: containing the material files
- preview: containing the preview baked textures
The Variations tab
This tool lets users create their variation types made of several meshes. Users can also add extra meshes and material constraints to vary their variations.
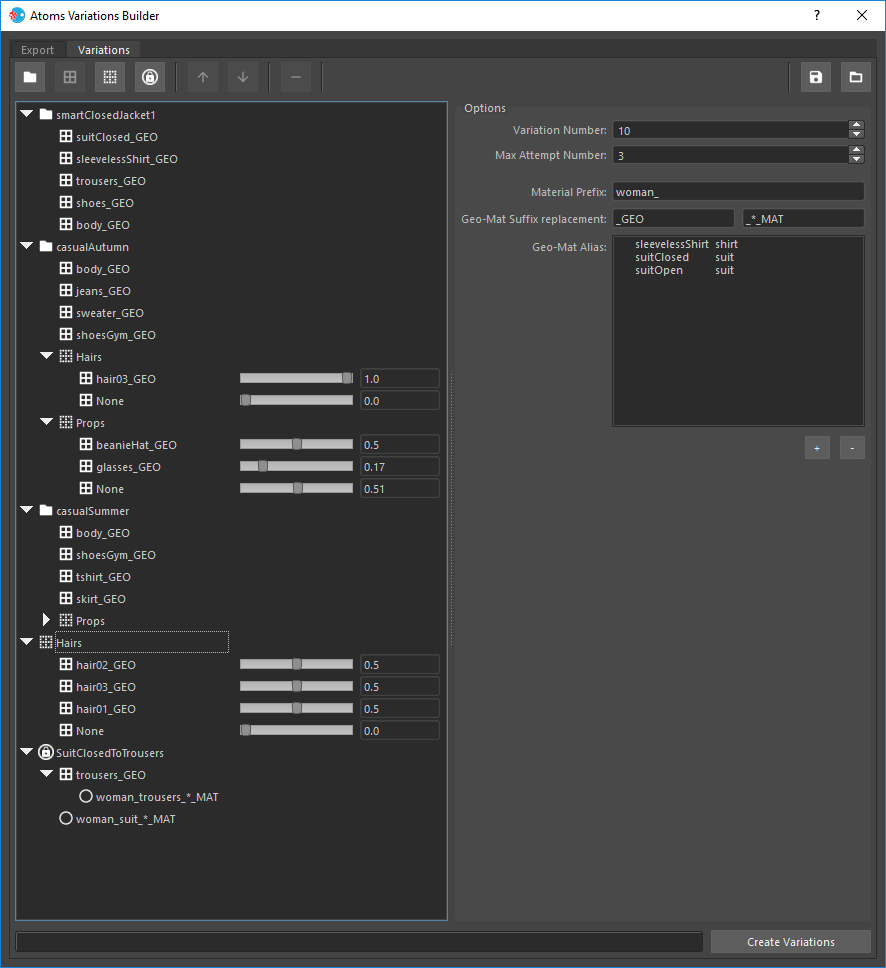
First, we'll have a look at the parameters on the right side:
- Variation Number: this is the number of variations that are created for each variation type
- Max Attempt Number: the tool will make sure two variations with the same meshes and materials won't exist for the same variation type. The tool will attempt to create a different variation only for this given number of times.
- Material Prefix: a material prefix used for the material search.
- Use Current Material: makes sure each mesh is given the current material if a material cannot be found with the rules you provide. If you don't activate this option and material cannot be found, the mesh is not added to the variation.
- Geo-Mat Suffix replacement: when searching for material in the host scene, the tool replaces the first value with the second value in the current geometry name. Users can use "*" inside the second value to make the search of the material more flexible. For instance, when host materials were created with a naming convention in the host scene (i.e. ending with "_black_MAT", "_brown_MAT", etc.)
- Geo-Mat Alias: here you can specify a list of replacements that can be run on your mesh names. For instance, if you have two meshes named "suitClosed_GEO" and "suitOpen_GEO" and they both work with materials named like "suit_black_MAT", "suit_brown_MAT", etc. you should specify in this list two aliases: "suitOpen" - "suit", "suitClosed" - "suit".

Test Case
To make things a bit less confusing, let's have a look at a practical example.
Inside the UI there are:
- three variation types "smartClosedJacket1", "casualAutumn" and "casualSummer".
- one global extra geo named "Hairs"
- one material constraint named "SuitClosedToTrousers"
- The "casualAutumn" variation type has two extra geo groups "Hairs" and "Props".
After the variation creation process, the user will end up having 30 variations in the host scene.
In this host scene, all materials are named with the "woman_" prefix.
The UI items can be created by using the buttons on the top. From left to right, the buttons will:
- Create a variation type
- Add the host selected geo to the selected variation type or extra geo group.
- Create a new extra geo group. If a variation type is selected, the extra geo group will be added to it; otherwise, it will be created at the root level. For each geo you can specify a distribution weight.
- Create a material constraint.
- Move up the selected elements.
- Move down the selected elements.
- Delete the selected elements.
On the right of the UI, you have two more buttons for saving the current settings and loading a setting file in the UI. The settings are stored as a json file.
Geometries
Geos also can belong to a variation type and to an extra geo group. Geos can also be nested (multiple level). To nest a geo select a geo from the tree and press the "add geo" button.
Each “weightable” geo has a lock button next to the geo name. The user can lock a geo by pressing that button.
If your locked mesh is:
not a child of another “weightable/lockable” geo, then it is going to be added to each variation of that VariationType.
a child of another “weightable/lockable” geo, then it is going to be added to each variation of that that VariationType only if the parent geo is added to the Variation.
Please note, if you have any other unlocked geo/geos at the same level of a locked geo, the standard workflow will be applied: one of those geos will be picked according to their weights.
Extra Geo
Only one geo per extra geo group will be picked for each variation.
There is also a None element under each extra geo group. If you wish to not have extra geo in all variations of the same type, you should set the weight of the "None" to a value higher than 0.
As you can see, the "casualAutumn" variation type has two extra geo groups, one of them is named "Hairs", exactly as the extra geo group at the root level.
The "Hairs" local extra geo group will override the root "Hairs" extra geo group and will make sure that all casualAutumn variations will only use the hair3_GEO.
Material Constraints
Material constraints are useful whenever you want to make sure a specific material is assigned to a geo whenever another material has been already picked for another geo by the building process.
For instance, you might want to have the jackets and trousers of your characters to have the same color, or have a specific hair material when a skin material is selected.
In this example, the suit material drives the material of the trousers. When the source material and the destination material contain both a "*", then the string matched in the source material name will be applied to the destination material. Alternatively, you can provide the "*" wildcard only for the destination material.
If no material is found for the provided constraints, then the material search will fall back to the standard search with the parameters described above.
For material constraints, you define the items by typing or dragging and dropping items from inside the UI or the host (please bear in mind you can drag and drop geo or materials with the middle mouse button in Maya).
The Building Process
These two steps describe how the algorithm process each variation type:
- A material is searched for all the geometries of the current variation type, first with the standard search and then with the material constraints.
- For all extra valid geos for the current variation type, a mesh is picked, and material is assigned, first with the standard search and then with the material constraints.
Please note:
- the geos are processed in the UI order.
- if no material is found for a geo, the geo is not added to the variation.
- If you have material constraints please make sure the driven geo/material comes after the driving geo/material.
LODs
Setting up LODs is quite simple; it is, in fact, the same as building a variation.
The only thing that changes is your render layer (or take) name. In Atoms, a LOD is valid only as a child of a variation group. For this reason, we thought of the following naming convention: the LOD name should always start with "$(VariationName)____".
Say for instance a render layer contains a LOD definition (A) for the Variation1 variation, then its name will have to be "Variation1____A".
Please use the LOD module to assign lods to your agents.
Related content
Copyright © 2017, Toolchefs LTD.