Locomotions
- Daniele Federico
Locomotions assets allow for blending of animation clips based on the value of two inputs. These inputs are two agent metadata: "targetLinearVelocity" and "targetAngularVelocity".
These metadata are used for building a 2D point which is then used to sample the right animation in the Locomotion graph. targetLinearVelocity is used as the X value, while targetAngularVelocity is the Y value.
These metadata are usually modified by Atoms Behaviour modules during simulation time, but can also be edited by the user.
Usually locomotion assets are useful for blending clips such as idle, walk, run, jog, etc
From AtomsVFX 5.4.0, a new metadata has been introduced for handling unsync clips: "targetFrameAngularVelocity"
This metadata contains the value of the angle between the current direction and the previous direction.
Before you can start building a Locomotion asset, you need to ensure your animation clips are properly set up as failing to do this could lead to unexpected results:
- Animation clips frame ranges should not differ too much, if all your clips have frame ranges between 30 and 60 frames and you have a clip of 300 frames in the locomotion you could experience animation artefacts
- Animation clips must have the same number of cycles
- As with the state machine asset, it is important that all start with the same foot down state. This means that if your walk clip starts with the right foot being down, the same should happen for the other clips.
- Turning and Unsynced clips needs to have the direction type to local.
- Unsynced clips are better set to not loopable.
Building a locomotion asset
The graph X value represents the linear velocity of the agent (meaning the velocity in which the agent is moving) while the Y value represents its angular velocity (meaning how much the agent is turning). Both velocities are considered per frame.
To add animation clips to the graph you can right click on the viewport or click on the Animation Clip Dialog button . The Animation Clip Dialog will show up, you can then either drag and drop an animation clip from the dialog onto the viewport (you can only drag one at a time) or select multiple animation clips and press on the "Import" button.
When adding new clips Atoms will evaluate the best position on the graph for each clip.
Atoms uses the following logic:
- it finds all the clips already in the graph and those being imported
- it finds the clip with the minimum frame range
- it uses the minimum frame range to normalize the angular velocity for each clip new imported clip
- it places the clip in the graph based on the linear and new normalized angular velocity
Based on this logic, your clips might appear on different places depending on which clips you are importing or have imported.
Once you have imported all the clips for your locomotion, you can make Atoms to layout them again according to the method described above, by selecting the clips and pressing the layout button  .
.
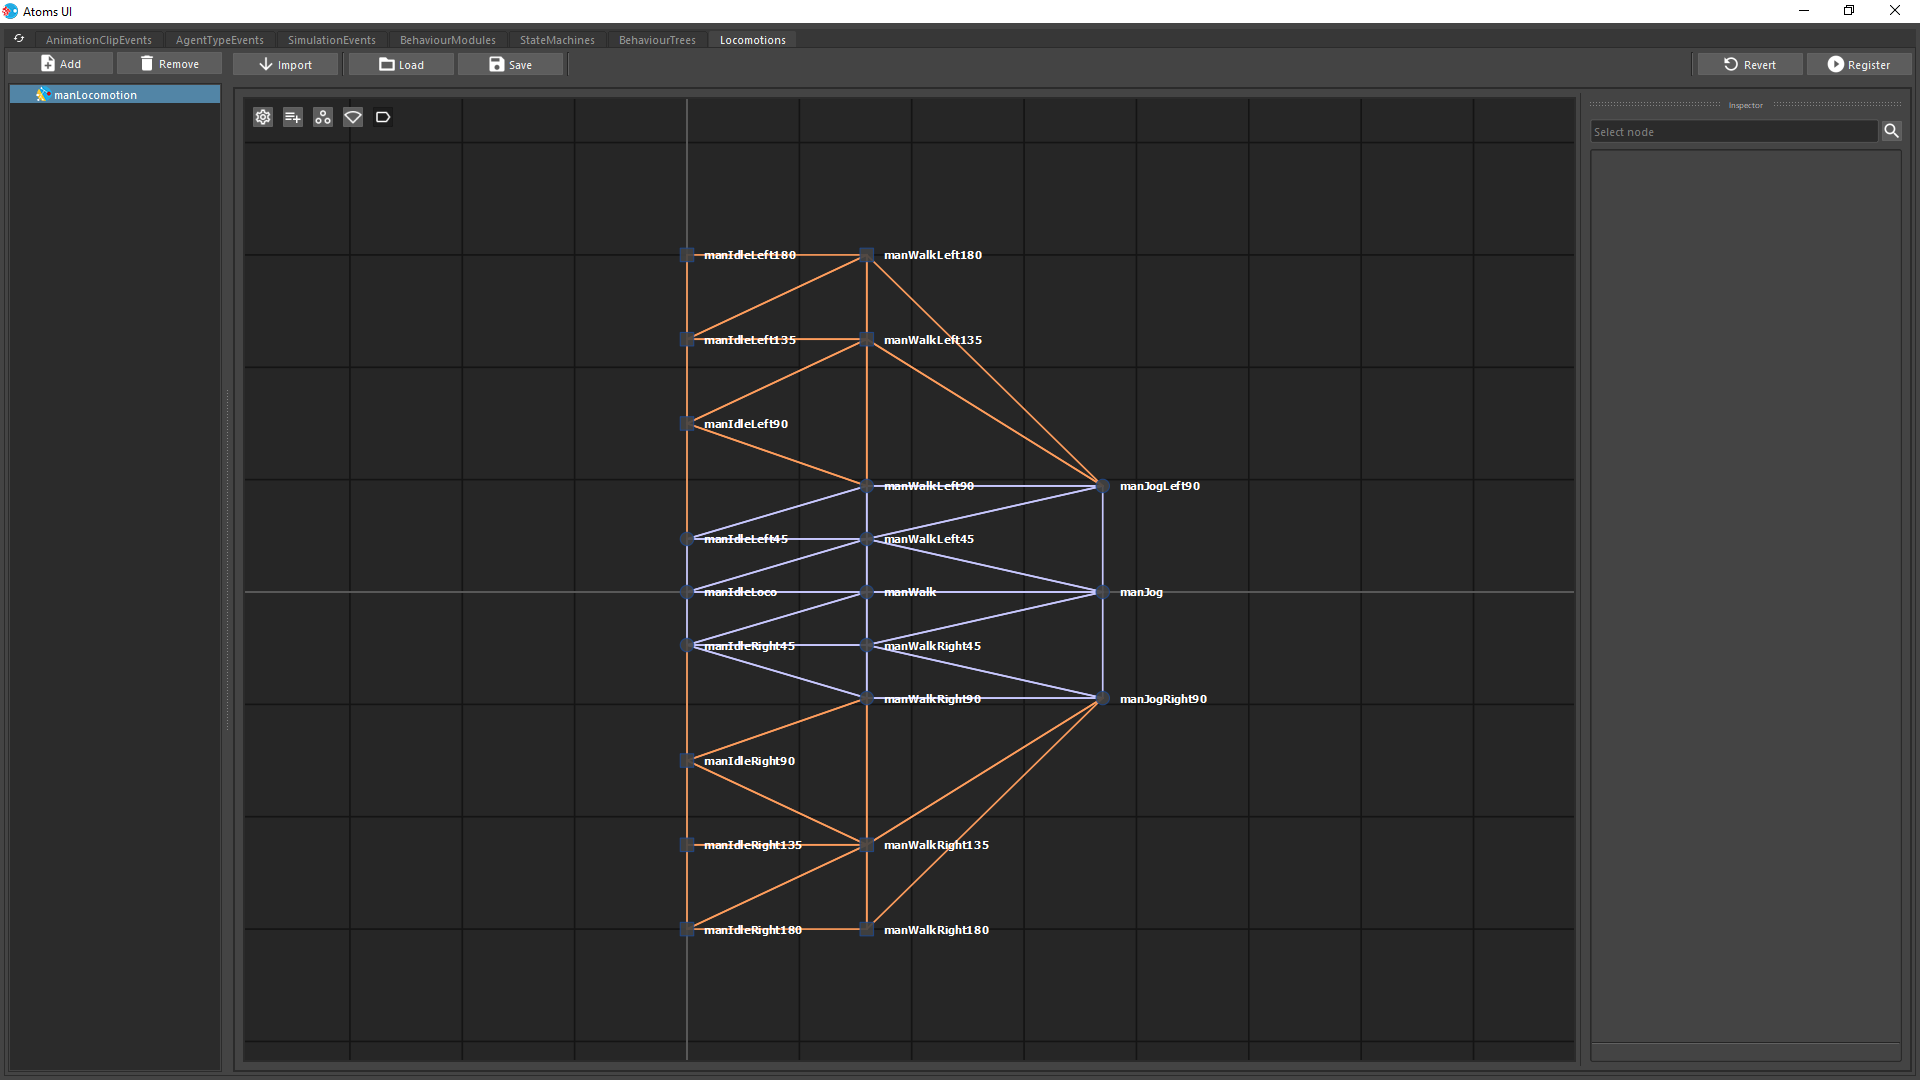
Clips and triangles
The position of your clips in the graph is very important when building a locomotion asset.
It is important to understand that:
- the initial positioning made by Atoms is an approximation, as it will be based on average velocities (clips do not have a constant speed through time).
- if the actual speed of your clips is very different from its X value in the graph, your agent velocity during the simulation might different from the input target velocities
For this reason, it is ok if users move the animation clips to adjust the graph.
Every time a new clip is added, moved or deleted new triangles will be rebuilt. These triangles serve a simple purpose: helping Atoms find the the right clips to play at every frame.
At every frame Atoms will:
- build a point (p) using the targetLinearVelocity (X) and targetAngularVelocity (Y) metadatas
- find the triangle to which p belongs
- calculate the barycentric coordinates (bc) of p on the triangle
- as each triangle vertex is a clip, Atoms will use bc as the clip weights (all the other clips in the locomotion system will have a zero weight)
Unsynced clips and inspector
Atoms locomotion system provides support for unsynced clips. Unsynced clips are clips required for specific actions, such as turning 90 or 180 degrees.
These clips cannot be usually integrated in a locomotion system as they might create weird artefacts during the animation blending.
Once Atoms finds a suitable unsynced clip for a specific change of direction, it will wait for the right transition frame for the clips currently playing, then will play the unsynced clip by itself.
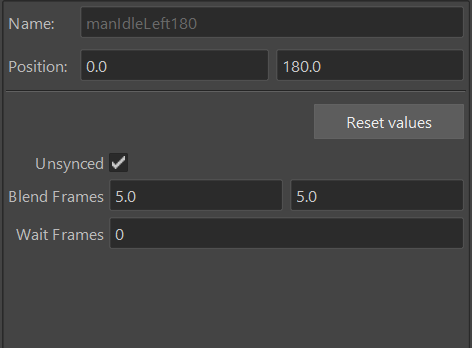
To make a clip "unsynced" users can use the toggle in the inspector and provide blend in and out frames.
Once a clip is made unsynced, all the triangle edges containing that clip will turn orange.
There is one final thing to know about unsynced clips.
The lookup for these clips is one by using the (targetLinearVelocity,targetFrameAngularVelocity) pair, while standard clips use (targetLinearVelocity,targetAngularVelocity).
This is because these clips should play only when the direction angle variation at the current frame matches their Y value.
Additionally you can also provide a value for "Wait Frames" to make sure the agent plays an unsync clips only when the direction angle variation happens for a number of frames. It is recommended to keep this value to 0.
Unsynced clips should always the outer clips of a locomotion graph.
UI Interaction
Please find below a list of mouse actions which can be performed in the node viewport.
- Left mouse click on node: Select node (works with Shift and Ctrl modifiers)
- Left mouse click on node+ drag: Select node and move
- Left mouse click on viewport + drag: Select node with a marquee (works with Shift and Ctrl modifiers)
- Right mouse click on viewport: show animation clip dialog
Please find below a list of keyboard shortcuts:
- f : frame graph
- Shift + f: frame selection
- Backspace or Del : delete selected nodes
- Ctrl + Z: undo
- Ctrl + Y: redo
Copyright © 2017, Toolchefs LTD.