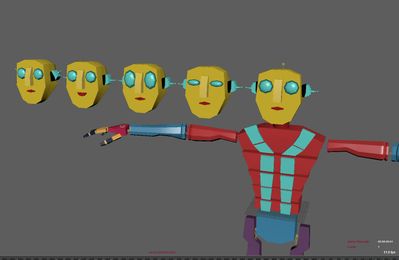
Let's open the AtomsRobot.ma file and the robot head, duplicate the robot head creating multiple expression.
Then select the the meshes and the original head and create a maya blend shape deformer.
Exporting meshes
You need to export the blend shapes target. If you use the variation builder, Atoms automatically exports the blend shapes data inside the meshes.
If you want export them manually, open the atoms mesh exporter from the atoms menu: Atoms > Export > Mesh exporter
Set the output path, then turn on the "export skin weight option". Inside the skeleton path filed, pick the atomsRobot.atomsskel from the AtomsMaya/data folder. Then select the robot Hips joint and press the refresh button. Finally turn on the "export blend shapes" option, select the mesh you want export and press the "Export" button. This tool automatically writes points, normals, id and name of each target inside the mesh file.
If you want to inspect the mesh content, open the file as a MapMetadata in python or c++, the blend shapes data are stored inside the "blendShapes" key
import AtomsCore
mesh_file = "robot1_head_blend.geos"
ark = AtomsCore.Archive()
if ark.readFromFile(mesh_file):
    mesh = AtomsCore.MapMetadata()
    mesh.deserialise(ark)
    for geo in mesh.keys(): #iterate over each geo
        targets_data = mesh[geo]["blendShapes"]
        for i in range(len(targets_data)):
            target = targets_data[i]
            points = target["P"].value()
            normals = target["N"].value()
            id = target["id"].value()
            name = target["name"].value()
            print id, name

Importing meshes
Create a new scene, and now import the robot variation table. From the atoms menu execute Atoms > Variations > Import variation json. Set the robot.json file form the AtomsMaya\data\variations folder. This will load into the scene the robot variation table.
Open the variation manager from the atoms menu: Atoms > Variations > Agents Variation Manager. Select the atomsRobot from the column on the left and then go inside the Geometry tab. Replace the robot1_head path with the mesh you exported. Now press ctrl+s or from the widget menu execute File > Register to Atoms to save the changes.

Setting up variations
- Create and agent group node.
- Add a grid layout and set the grid size to 5,0,5
- Add a state machine module
- Add a variation module and set the variationName attriute to "Robot1"
- Change the display type to variations
- Rewind the scene

Setting targets weight
The targets weights are controlled by some double metadatas. The metadata name should have the following convention:
AgentTypeName_VariationGeometryName_TargetIndex
In our case the following metadata names are valid:
- atomsRobot_robot1_head_0
- atomsRobot_robot1_head_1
- atomsRobot_robot1_head_2
- atomsRobot_robot1_head_3
The target index is the order used by the maya belnd shapes deform, so the index 0 is the first input of the the former, the index 1 the second and so on.
We can add and control these metadatas using the AddMetadata module
- Add an "AddMetadata" behaviour module
- Set the name attribute to atomsRobot_robot1_head_0
- Set the type attribute to double
- Set the double value attribute to 1.0
- Rewind the scene
Try to add more addMetadata modules on the same agent group to control the atomsRobot_robot1_head_1,atomsRobot_robot1_head_2 etc.. metadatas. You can also add keyframes on the doubleValue attribute to animate the blend shapes.

Adding animation
To add more complex animation or animation clicles to the blend shapes we can use the blendShapesAnim module. Before start to use this moduel you should export some animation from your setup scene. So open the atomsRobot scene were you created the blendshapes. Add some keyframes on the targets weight of the maya blend shape deformer.

Now select the robot head and open the blend shapes anim exporter from the atoms menu: Atoms > Export > Blend shapes anim exporter
Set the output path and the frame range, select the head mesh and press the run button.

Go back to the atoms scene and remove all the addMetadata nodes.
Add a blendShapesAnim behaviour module. Inside the anim data attribute press the Add button to add a new row.
Fill the row using atomsRobot as agent type, robot1_head as geo name, triggerAnim as metadata name, the path of the animation you exported as anim file and in the last column add loop if you want play the animation in loop.
Now the animation is activated by the triggerAnim metadata. So let's add this metadata using ad addMetadata module. Create an addMetadata module and place it before the blendShapesAnim module. Set the name attribute to triggerAnim, Change the type to double and set the doubleValue to 1.0.
Now rewind the scene and press play.
You can add multiple rows to control multiple animations at the same time.

The animation is controlled by the triggerAnim metadata. So to creates a more complex setup we can use an area trigger to drive this metadata.
First let change the agent state to 1 inside the state machine to make them walk. Inside the addMetadata module change the double value to 0 because the area trigger module will drives this value. Now create a areaTrigger module and create a plane in the scene. Connect the plane to the areaTrigger module (remember to connect also the translation/rotation/scale) and set the metadata name attribute to triggerAnim, the double value to 1.0 the blend in and out to 10 and the random delay in and out to 5. Move the area trigger before the blendShapeAnim module. Rewind the scene and press play.
